| Linux-Mandrake: |
| User Guide and |
| Reference Manual |
MandrakeSoft
January 2000 http://www.linux-mandrake.com
The best way to understand "how it works" is to look at a
practical case, which is what we are going to do here. Suppose you have
just bought a brand new hard disk, still with no partitions on it. Your
Linux-Mandrake partition is full to bursting, and rather than
starting again from scratch, you decide to move a whole section of the
tree structure to your new hard disk. As this new disk is very big, you
decide to move your biggest directory to it: /usr. But first, a
bit of theory.
As we already mentioned in the Install guide, every hard disk is divided into several partitions, and each of these partitions contains a filesystem. While Windows gives a letter to each of these filesystems (or actually, only to those it recognizes), Linux has a unique tree structure of files, and each filesystem is mounted at one location in the tree structure.
Just as Windows needs a "C: drive", Linux has
to be able to mount the root of its file tree (/) somewhere, in
fact on a partition which contains the root filesystem. Once
the root is mounted, you can mount other filesystems in the tree
structure, at different mount points in the tree structure. Any
directory below the root one can act as a mount point.
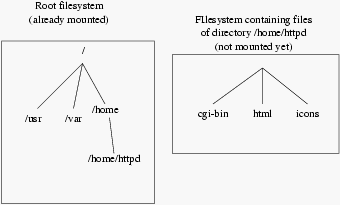
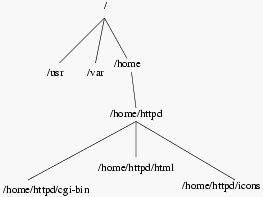
This allows great flexibility in configuration. In the case of a
web server, for example, it is common to dedicate a whole
partition to the directory which hosts the web server data. The
directory which contains them is generally /home/httpd, which
will therefore act as the mounting point for the partition. You can see
in figures 56.1 and 19.2 the situation of
the system before and after mounting the filesystem.


As you can imagine, this offers a number of advantages: the tree structure will always be the same, whether if extends over a single filesystem or several dozens[20], and it is always possible to move a bulk key part of the tree structure physically to another partition when space becomes lacking, which is what we are going to do here.
There are two things you need to know about mount points:
Regarding the principles referred to above and as far as we are
concerned in this section, there are two things to note: a hard disk is
divided into partitions and each of these partitions hosts a filesystem.
Now, at present, your brand new hard disk has neither, so that is where
you have to start, beginning with the partitioning. For that you must be
root.
First, you have to know the "name" of your hard disk, i.e.
what file designates it. Suppose you set it up as a slave on your
primary IDE interface, it will then be /dev/hdb[21].
mount and umount commandsNow that the filesystem has been created, you can mount the partition.
Initially, it will of course be empty. The command to mount filesystems
is the mount command, and its syntax is as follows:
mount [options] <-t type> [-mount options] <device> <mounting point>
In this case, we want to mount our partition on /mnt (or any
other mount point you have chosen -- don't forget that it must
exist); the command for mounting our newly created partition is as
follows:
$ mount -t ext2 /dev/hdb1 /mnt
The -t option is used to specify what type of filesystem the
partition is supposed to host. Among the filesystems you will encounter
most frequently, are ext2 (the Linux filesystem),
vfat (for all DOS/Windows partitions: FAT
12, 16 or 32) and iso9660 (CDROM filesystem).
The -o option is used to specify one or more mounting options.
These options depend on the filesystem used. Refer to the
mount(8) manual page for more details.
Now that you have mounted your new partition, you need to copy the whole
directory /usr into it:
$ (cd /usr && tar cf - .) | (cd /mnt && tar xpvf -)
Now that the files have been copied, we can unmount our partition. To do
this the command is umount. The syntax is simple:
umount <mounting point|device>
So, to unmount our new partition, we can type:
$ umount /mnt
or else:
$ umount /dev/hdb1
As this partition is going to "become" our /usr
directory, we need to tell the system. To do this, we fill in:
/etc/fstab fileThe /etc/fstab file makes it possible to automate mounting of
certain filesystems, especially at system startup. It contains a series
of lines describing the filesystems, their mount points and other
options. Here is an example of a /etc/fstab file:
/dev/hda1   /           ext2    defaults        1 1
/dev/hda5   /home       ext2    defaults        1 2
/dev/hda6   swap        swap    defaults        0 0
/dev/fd0    /mnt/floppy auto    sync,user,noauto,nosuid,nodev,unhide 0 0
/dev/cdrom  /mnt/cdrom  auto    user,noauto,nosuid,exec,nodev,ro 0 0
none        /proc       proc    defaults        0 0
none        /dev/pts    devpts  mode=0622       0 0
A line contains, in order:
dump utility backup flag,
fsck
(FileSystem ChecK).Surprise, surprise, there is always an entry for the root filesystem.
The swap partitions are special since they are not visible in
the tree structure, and the mount point field for these partitions
contains the keyword swap. We will return to /proc in
greater detail.
Let's get back to the subject. You have moved the whole /usr
hierarchy to /dev/hdb1 and so you want this partition to be
mounted at boot time. In that case you need to add an entry to the
file:
/dev/hdb1 /usr ext2 defaults 1 2
Now the partition will be mounted at each boot. It will also be checked if necessary.
There are two special options: noauto and user. The
noauto option specifies that the filesystem should not be
mounted at startup but is to be mounted explicitly. The user
option specifies that any user can mount and unmount the filesystem. As
you can see, these two options are logically used for the CDROM drive
and floppy drive. There are other options, and /etc/fstab even
has its own manual page: fstab(5).
Last but not least of the advantages of this file is that it simplifies
the mount command syntax. To mount a filesystem referenced in
it, you can either reference the mount point or the device. So, to
mount a floppy disk, you can type:
$ mount /mnt/floppy
or:
$ mount /dev/fd0
To finish with our example of moving a partition: we have copied the
/usr hierarchy and completed /etc/fstab so that the new
partition is mounted at startup. But for the moment the old /usr
files are still there! We therefore need to delete them to free up space
(which was, after all, our initial aim). To do this, then, you need to:
/usr directory (i.e. the
"old" one, since the "new" one is not yet mounted):
rm -Rf /usr/*;
/usr: mount /usrand you are finished.